If you’re reading this article, you’ve likely done your research and made the decision to get your hands on some of the Ripple native token, XRP. If that is indeed the case, we’ll show you where to find it, how to buy it, and briefly cover what to do with it once it’s yours.
Buying XRP is just like buying any other cryptocurrency on the market today. There are a few routes you can take, but the process can always be broken down into 2 familiar steps: buy crypto, secure crypto.
This guide will focus on the different gateways currently available to investors.
Get Your XRP Wallet Address First
That being said, we’ll start by directing you to our Cryptocurrency Wallet Guide. It’s not tailored to XRP, but it will get you familiar with the safest crypto storage methods, if you’re not already.
This is important because the first buying method below requires a personal wallet address before the purchase can be made, and it’s generally best practice to have control over the wallet holding your XRP.
We recommend using a hardware wallet, but if you’re not interested in purchasing a cryptocurrency wallet, opt for a paper wallet for maximum security, or a desktop wallet for convenience.
Whatever option you choose, make sure:
- It supports XRP.
- You understand what you’re doing.
- The developers of the wallet you choose can be trusted.
- Never share/lose your private keys.
Once you have a public key for your personal XRP wallet address, you’re ready to buy XRP. Let’s get to it!
Buying XRP
Entering the cryptocurrency market gets easier every year, and has led to 2 basic means of entry, which can be boiled down as such: either you can buy your desired cryptocurrency with fiat, or you have to buy it with a more mainstream cryptocurrency, such as BTC or ETH.
Luckily for you, XRP is popular enough to buy with fiat.
While this is the most convenient method for beginners, it’s not optimal if you’re planning to buy frequently, due to higher fees. See the method below if you plan to get into the cryptocurrency space, or dollar cost average in.
Security Precaution: Make sure the website exhange you’re visiting is secure, and the domain name is spelled correctly.
How to Buy XRP Directly with USD or EUR
There are a few websites that currently facilitate the purchase of XRP with fiat directly from their website. More accurately, you send them your money, they go to an online crypto exchange to buy your XRP, then they send it directly to your XRP wallet.
As you can see, you’re paying a middle man, which is largely what the creation of cryptocurrencies set out to avoid in the first place. But if you’re a total beginner, it can help to ease the learning curve.
Changelly
![]()
Changelly is one of the most popular, user-friendly exchanges available today. It’s incredibly easy to sign up, and they require minimal information to get started.
Starting from scratch, the first thing you’ll need to do is, of course, sign up. Click the Join button in the top right corner of the screen, click Sign Up, then enter your email address. They’ll send you an email instantly. You click the link in your email, and they’ll respond by sending your new login credentials.
Alternatively, you can use your Gmail, Facebook, or Twitter account to sign up and login.
Select Fiat to XRP
Now that you have an account, make sure you’re signed in, then go to Changelly’s homepage. You’ll see 2 input fields, 1 for the type of currency you’ll be sending them, and 1 for the cryptocurrency you’ll be sent in return.
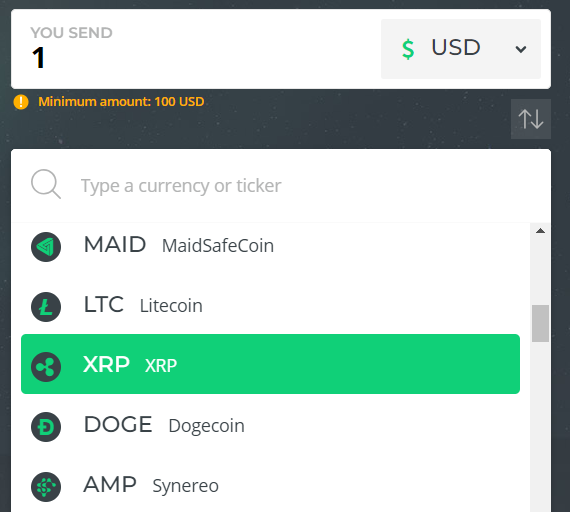
Select USD or EUR from the first dropdown menu, then select XRP from the second dropdown menu.
Now you’ll be able to enter the amount of fiat you’d like to send to Changelly, with a minimum deposit of $100 USD or $100 EUR. When you enter in your fiat amount, the second input field will automatically display the amount of XRP you’ll receive.
Enter XRP Wallet Address
Click Exchange Now, and you’ll be taken the next screen. Here you’ll enter your XRP wallet address. You also have the option to enter a destination tag, which provides the recipient with a receipt of payment.
After you enter your XRP wallet address, you’ll be taken to a screen that asks for your Billing Information. Next, it’s time to pay. Changelly currently accepts Visa and Mastercard credit/debit cards, and works with a company called Simplex to handle the payment and exchange process. Enter your information, and you’ll be directed to the verification process.
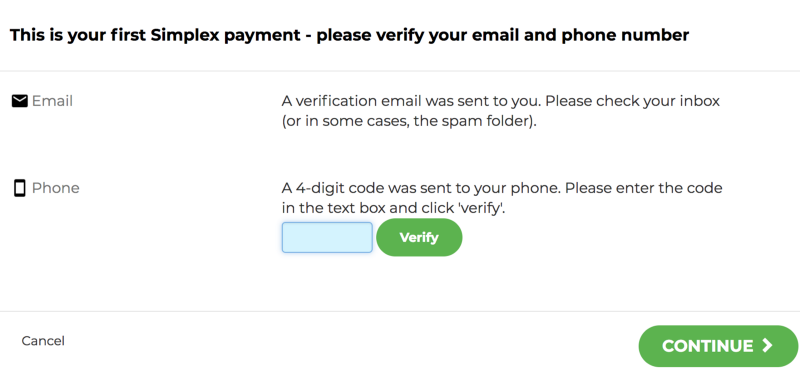
Verify Payment and Identity
You’ll need to have your phone and email address ready for this step, as both will be used to verify the transaction. Follow the steps, and click Continue.
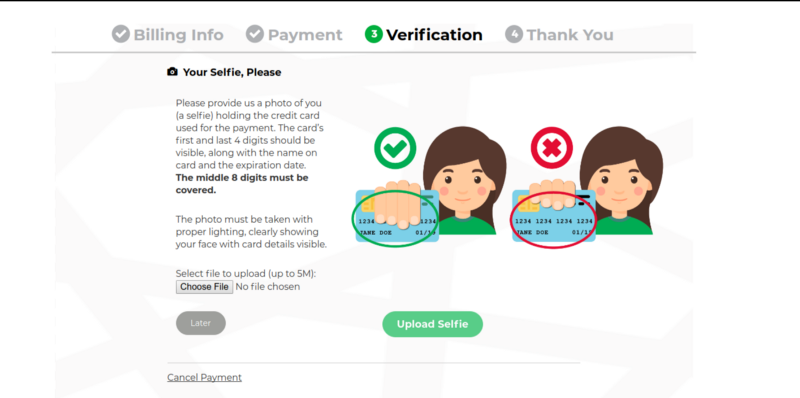
Next, you’ll need to verify your identity, which is the most detailed part of this process. It also requires the most trust in Changelly. Since you’re sending them fiat, they’re required to have proof of your identity.
This means you’ll need to send a picture of you passport or government-issued ID, as well as a picture of you holding your ID in front of your face. You’ll run into a step like this for any regulated entry point into the market.
Once you’ve uploaded your documents, Changelly will verify your documents, and when they’re finished, Simplex will process your transaction, and send the XRP to your personal wallet. If you run into any issues, check out their FAQ page, and if that fails, contact them through the chat icon on the lower right-hand corner of the screen.
More Fiat to XRP Gateways
You can find a similar process in a few other places like these:
How to Buy XRP With Cryptocurrency
There isn’t much difference between buying XRP with fiat versus buying it with another cryptocurrency.
The same process is still happening, except now you’re involved with each step, and getting more for your money because of it. If this is your first time buying cryptocurrency, it might seem like a lot to take in, but it’s a fairly straightforward process: buy crypto, trade for XRP, secure XRP.
Buying Crypto With Coinbase
![]()
One of the easiest ways to enter the crypto market (so far) is by using Coinbase to purchase a supported coin.
Initially, they only supported Bitcoin, Ethereum, and Litecoin. But over the course of 2017 they’ve added 9 altcoins to their platform, with plans to add more.
There’s a chance we’ll see XRP listed in the future, which would mean the entire purchasing process could be done using Coinbase.
Until then, there’s a couple extra steps for us to take in order to buy XRP with another cryptocurrency.
Sign Up With Coinbase
To begin, you’ll need to create an account with Coinbase. Go to their website and find the Get Started button in the top right-hand corner of your screen.
Fill out the information on the screen, and click “Create Account.” Coinbase will send you a confirmation email. Open it, click the relevant link, and then you’ll be asked for your cell phone number.
Once it’s entered, you’ll be sent a 7-digit code for verification. Once your phone is verified, you’ll be redirected to your Dashboard.
Verify Your Identity
A pop-up window should appear when you get to your Dashboard, asking to verify your identity, and you can always find this process in your settings. Click Upload ID, and you’ll be asked for a form of ID.
It depends what country you’re living in, but acceptable forms of ID usually include a passport or a driver’s license. After selecting the most convenient option, you’ll choose how to upload a photo of your ID, and when you’re finished, Coinbase will verify it.
Then you’ll be able to add a payment method.
If for whatever reason your ID isn’t verified, try again, or try a different form of ID. This can be a sticking point sometimes, and it might require a few attempts.
Add a Payment Method
Depending on your country, you’ll have different options for payment methods. The chart below shows the possibilities for US customers. To find a similar chart for your country, check out this Coinbase support page.
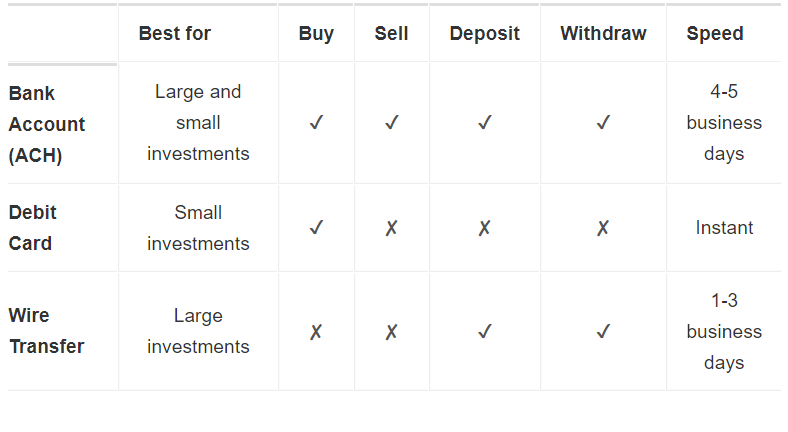
The quickest route to getting started is to set up your Visa or Mastercard debit card. Click the following links to learn how to sign up with you bank account or wire transfer.
Go to your Settings and find Linked Accounts. Click Add a Payment Method, then select Debit Card. Enter your card information.
Coinbase will temporarily charge your account 2 times between $1.01 and $1.99 (they don’t actually withdraw from your account). This is used as a means of account verification.
Open up you online banking information and find the 2 charges. Now you’ll enter the cent amounts ($1.XX) for both charges into Coinbase, and the payment method is now verified.
Buy Crypto
As previously mentioned, XRP is not available on Coinbase, but it’s worth noting that if it were, you could buy it at this point.
Since it’s not available, we’ll be buying Bitcoin (BTC), which we’ll then trade for XRP on another exchange.
Go to either Prices or Accounts from your Dashboard, then click Bitcoin. Click the Buy button, and enter the dollar amount you’d like to spend. Underneath the dollar amount, you’ll see the payment method you added in the previous step.
Double check it (you have 1 payment method at this point so it should be correct) then click Preview Purchase.
The next screen will show you the transaction information, and how much BTC you’ll receive. Make sure to note when you’ll be able to withdraw from Coinbase. Debit card users should be able to do so instantly.
Click Confirm Purchase, and if all goes as it should, you now have Bitcoin!
Trading BTC for XRP on Binance

Next, you’ll need to deposit your BTC into an exchange that supports XRP. For this example, we’ll be using Binance.
The signup process is similar to the Coinbase’s, except 2-factor authentication (2FA) is required to complete registration with Binance.
2FA is available and recommended for Coinbase, Changelly, or any crypto exchange, and is very easy to set up.
Register
Go to Binance and find the Register button. Fill in your information and click Register.
Next, you’ll need to complete your 2FA. This requires downloading the Google Authenticator app and connecting it to your Binance account. The process is well laid out and shouldn’t cause you any trouble. If you run into a snag, Google should solve it.
Deposit BTC to Binance from Coinbase
To deposit the BTC you bought with Coinbase, go to the Funds tab and select Deposits from the dropdown menu. From here, go to the left side of the screen and find the main dropdown menu, then select Bitcoin.
You’ll see a screen like the one below:
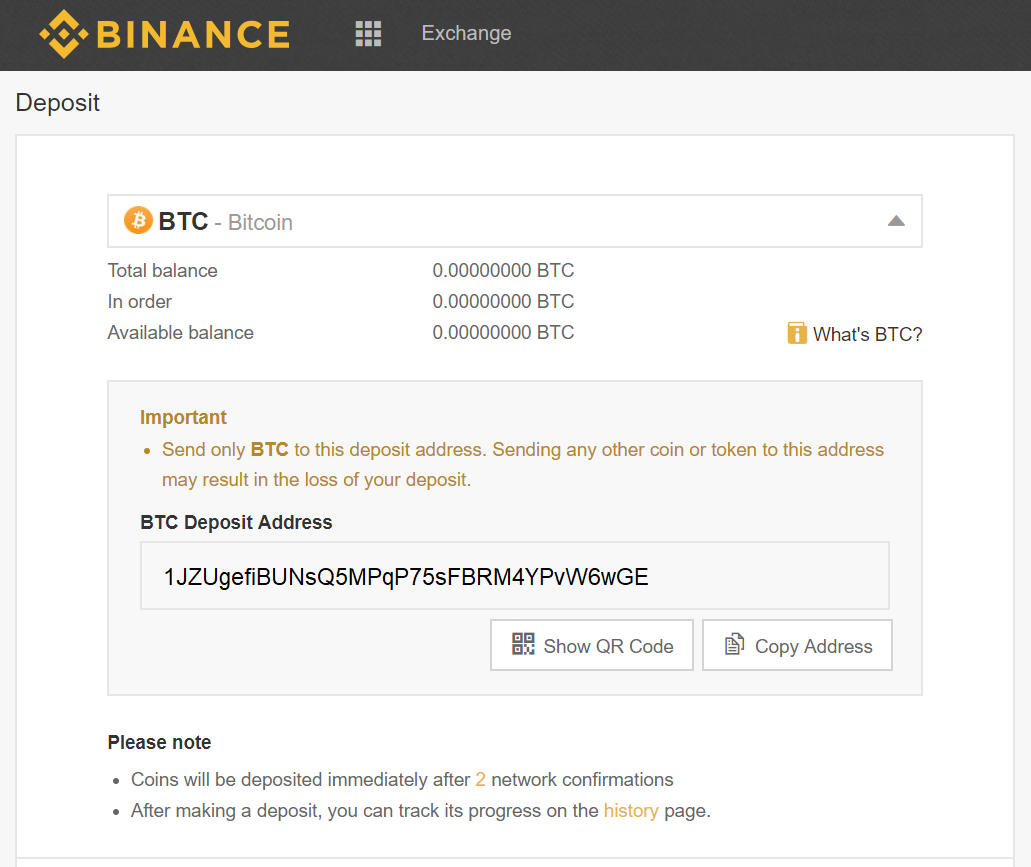
The important piece of information here is your BTC Deposit Address. This is how Coinbase will know where to send your funds.
Copy your BTC Deposit Address and head over to your Coinbase dashboard. Find the Accounts tab, go to Bitcoin, then find the Send button. If you’re on your phone, it’s a small paper airplane on the top right-hand corner of your screen.
This will bring up a screen that allows you to enter your Binance BTC Deposit Address. Paste the Binance Deposit Address, select the amount of BTC you’d like to send, and click Send.
Coinbase will ask you to verify the address you’re sending to, and it’s always a good idea to check the first and last characters (at least) of the deposit address to make sure they match.
Sending your funds to the wrong address will result in the loss of those funds.
Trade for XRP
You might have to wait a while (could take an hour) for the BTC to make it to your exchange wallet, but once the transaction is complete, you’ll be buying your XRP with the BTC you just deposited.
Find the Exchange tab on the top left-hand corner of your screen, and select Basic from the dropdown menu. The page you’ll be taken to might look a bit confusing, but like the rest of this process, it’s easy to get used to.
Go to the right side and search for the XRP/BTC pair, like in the image below:
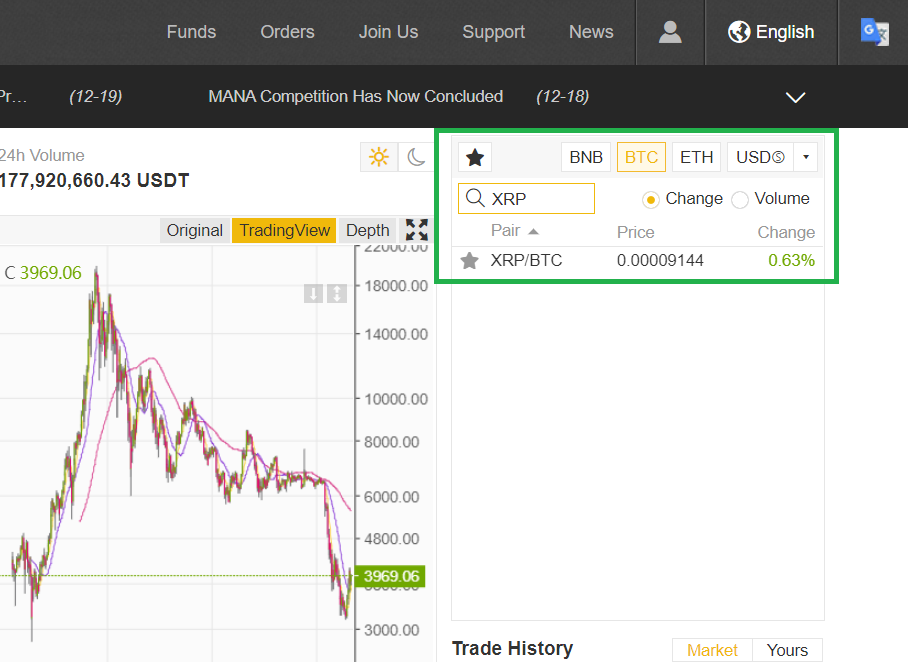
You’ll be greeted with the XRP/BTC chart, among other things, but the sections we need right now are located right underneath the chart, and to the left of it. Find the box labeled Buy XRP.
You’ll be responsible for selecting the price you’d like to purchase at (top input field) and the amount of your BTC you’d like to spend (bottom input field). The amount of XRP will be automatically calculated in the center input field.
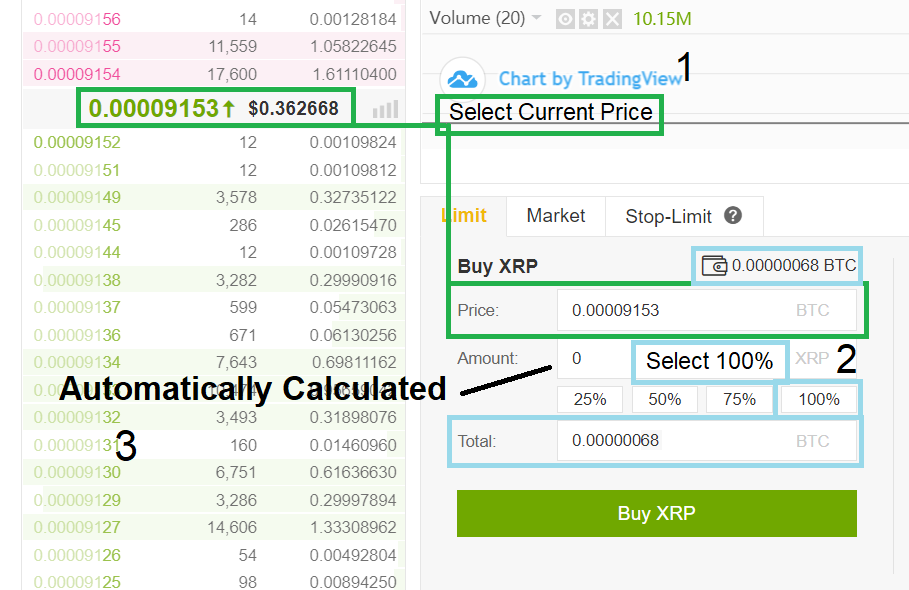
For this example, 100% of the Bitcoin in our Binance Wallet is being converted into XRP. Naturally, you could select any percentage you’d like to buy XRP with. You can also select any price you’d like to pay, but just because you select a price, doesn’t mean the order will be filled.
When you click Buy XRP, an order will be placed. If you’re buying near the current price, and since XRP is a high-volume coin, the order should fill almost instantly. That said, you might have to wait for a buyer, and your order might be filled in segments.
You can keep an eye on its progress by going to the Orders tab on the top menu and selecting Open Orders from the dropdown menu. Once the order is filled, you officially own XRP.
Withdraw XRP to Your Personal Wallet
It’s common knowledge within the cryptocurrency space that unless you need quick access to your coins for a trade, they shouldn’t be left on an exchange. This is one of, if not the most risky way to store your crypto.
Go to the Funds tab and click Balances in the dropdown menu. Find XRP from the long list of tokens, then click Withdraw. You’ll be taken to a semi-familiar screen, which will require your personal XRP wallet address.
Caution: Once again, it’s very important that your XRP wallet address is copied exactly as it is. Any deviation will result in the loss of your XRP. Err on the side of caution and check every character.
Paste that address carefully into the first input field, and if possible, include your withdrawal tag. You can also check No Tag to the right. Select the total amount of XRP you’d like to withdraw, and click submit.
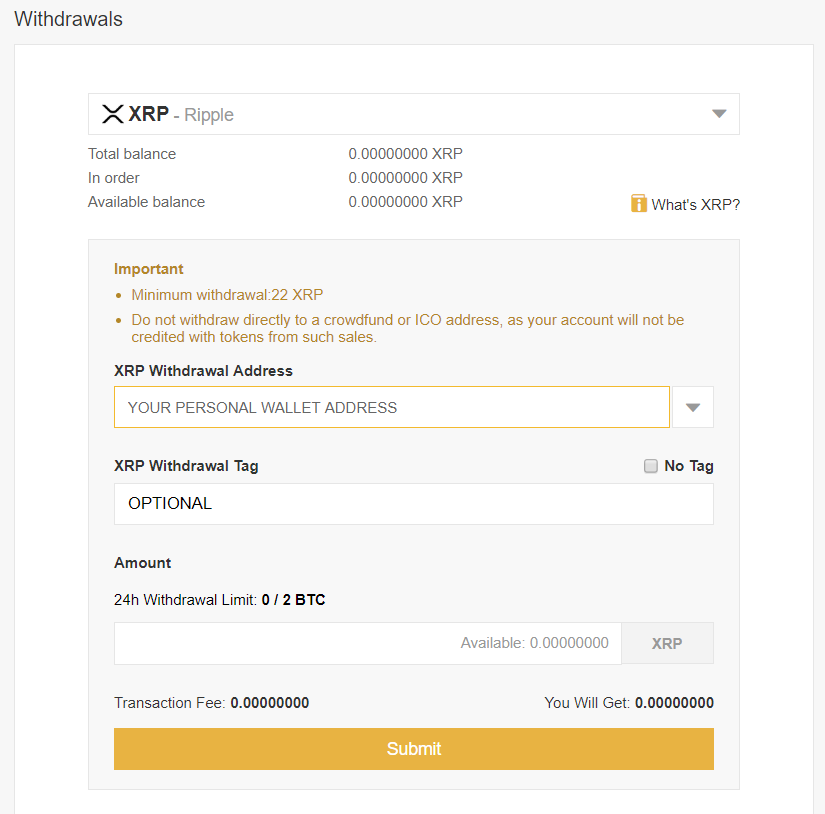
Binance will require you to enter a 2FA code, and they’ll also send you an email for verification. Open your email inbox and double check that the Withdrawal Address you entered is correct, then confirm the transaction.
Your withdrawal transaction information can be found by going to the Funds tab on Binance, and selecting Withdrawal History from the dropdown menu.
It will take some time, but next to the Txid field of the relevant withdrawal, a link will appear that will take you to a block explorer, where you can see the progress of your transaction. This will serve as proof once completed.
If everything went well, you now own XRP, and it’s been stored in the wallet of your choice.
Congrats!