
It’s kind of shocking how unaware most crypto investors are of this, but you can make money off the falling price of Bitcoin.
If you know what you’re doing, you can make a LOT of money when prices fall in a very short period of time.
Want to know how to make these numbers as well? Get yourself a coffee, because it’ll be your life changing read on making money when the bitcoin price falls.
Thousands of people stumbled into cryptocurrencies before it’s parabolic rise at the end of 2017, and some even sold near the all-time highs.
Furthermore, a very small number of investors had the wherewithal and experience to short (bet against) the market.
While a majority saw their bags plummet, a handful of pros made some serious gains on both the bull run of 2017 and the 2018 bear market.
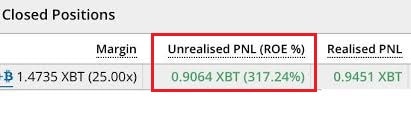
Looking at the gains of top traders on the platform we will cover in this guide – it is mind-boggling, to say the least:
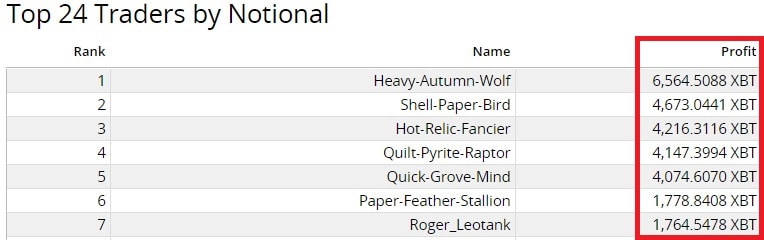
For those who are unaware, the profits in the image above are listed in XBT, which is equivalent to BTC… That means Heavy-Autumn-Wolf is sitting at $22,411,268.65 in Profit at the time of writing.
While these results clearly aren’t the norm, the fact remains that you have access to the same set of tools, and could continue building your portfolio if those tools are used correctly.
Simple exchanges like Coinbase offer a simplified user interface and an easy-to-execute process. ‘Intermediate’ exchanges, like Binance, offer more cryptocurrencies.
Advanced exchanges like BitMEX typically attract more professional traders due to the array of advanced features they offer, like short positions and leverage. This article will show you how to bet against the Bitcoin with BitMEX, but before we dive in, it’s important to understand 2 things.
Firstly, since we’re dealing with advanced financial investment features, it’s very important to understand the risks involved with advanced exchanges. If you’re unsure about something, take a step back and ‘go to school’ until you’re confident you understand what you’re doing.
Secondly, BitMEX isn’t available in the United States, so you might want to consider using a VPN.
Where Whales Make Money – Let’s Sign Up for BitMEX
BitMEX makes it extremely easy to sign up for their exchange.
Using any link to Bitmex in this article will save you 10% on trading fees for 6 months 🙂 That’s a lot and we will tell you why in a second.
To make the process as simple as possible, sign up for BitMEX now, before reading the rest of this article, so you can follow along.
First, go the BitMEX registration page, where you’ll be prompted with the following form:
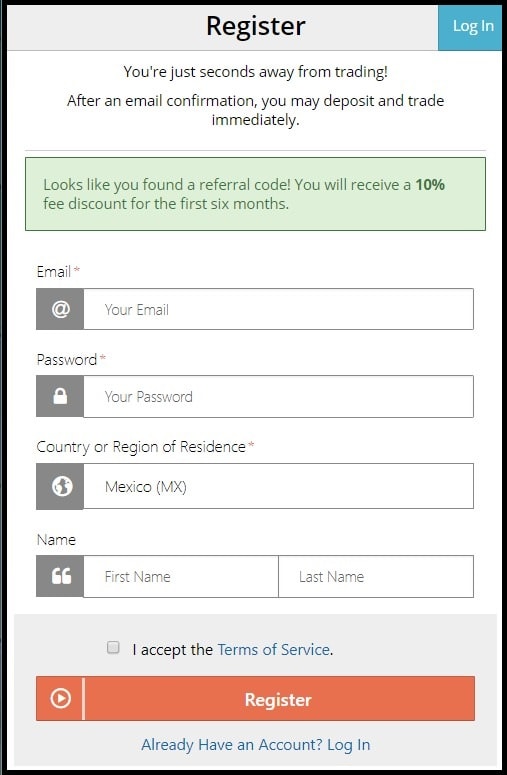
Enter an email address, create a secure password (short sentences with numbers and special characters work great) select your country of residence, then enter your first and last name.
Accept the Terms of Service, then click the Register button. You should receive a confirmation with further instructions, which looks like this:
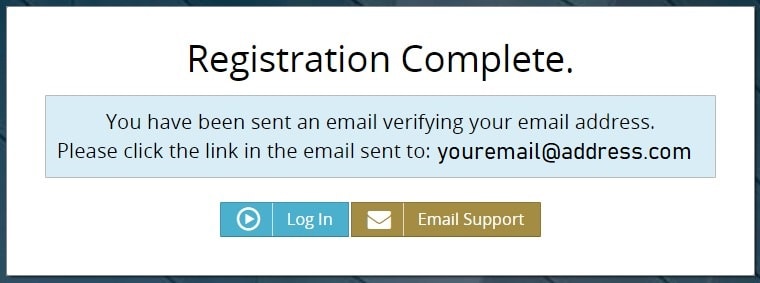
You’ll be directed to a verification screen, which will direct you to your email inbox. Log into your email inbox and wait for your confirmation email, which looks like this:
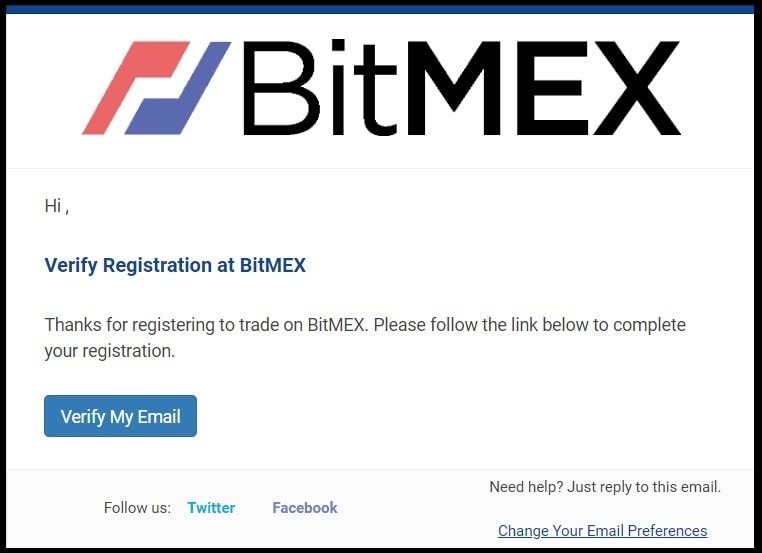
Click the blue Verify My Email button and you’ll be redirected to a confirmation page, which will then redirect you to the main BitMEX trading page.
How To Make Your First Profitable Trade on BitMEX
Now that you have your account, it’s time to learn what you can do with it. Trading strategies are typically honed over many years of trial and error, and it’s common to see new and intermediate traders practice with paper trading before introducing emotion with live trading.
With that in mind, if the price of Bitcoin falls, here’s what you need to do to make your first profits.
1. Funding Your Account
First, you’ll need to deposit Bitcoin into your account.
Go to the account tab (1), click deposit in the menu on the left-hand side (2), and your exchange wallet address will be generated (3).
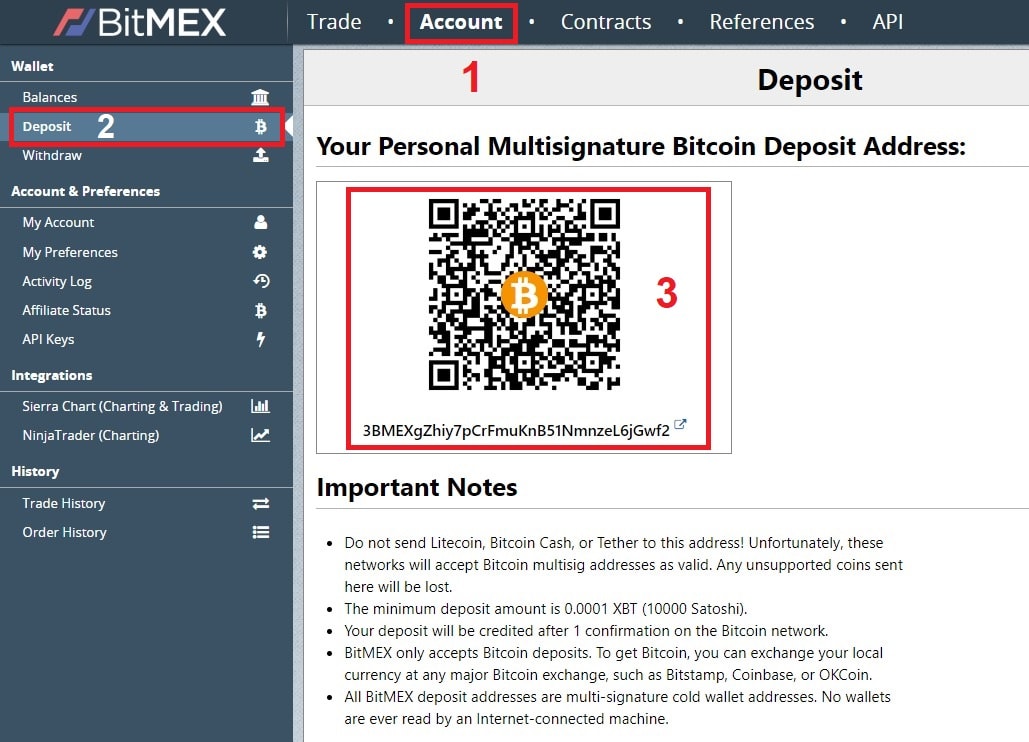
Now that you have your BitMEX wallet address, you’ll need to send BTC. If your BTC funds are coming from a smartphone, from the Coinbase app for example, you can send the funds using their QR code scanning feature.
Alternatively, you can simply copy and paste your BitMEX wallet address to send funds from your smartphone or computer.
Before sending your BTC, check to make sure the address is correct. Failure to do so could result in the loss of your funds, so make sure to check the first and last 4 characters at least, to verify you’ve entered the wallet address correctly.
Pro Tip: If you’re depositing a significant amount to your BitMEX wallet, or any new wallet, send 1% of your funds separately first. This ‘warms up’ the wallet by putting it on the blockchain, and heavily reduces the odds of sending your funds to the wrong address.
Your BitMEX account will be credited after 1 confirmation on the Bitcoin network, and when the funds are available in your account, you should see a notification at the top of your screen, like this:
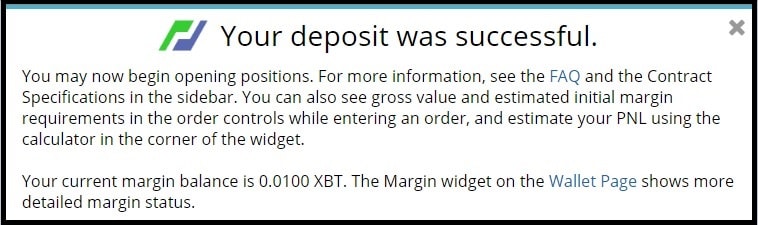
Now you’re ready to make your first trade!
2. How to Create a Short Position on BitMEX
In this step, we will teach you exactly step by step how to create a short position on bitmex or in other words, how to bet on bitcoin price fall.
For those who are new to the idea of shorting the market, check out the definition given by Investopedia:
Before you jump right into entering the trade, there’s a very useful tool available that allows you to calculate relevant information with ease. This makes it simple to confirm you’re making a good trading decision, and even easier to actually enter the trade.
After everything checks out on the calculator tool, you enter and confirm your trade. Of course, this is optional but also recommended.
3. Profit/Loss Calculator
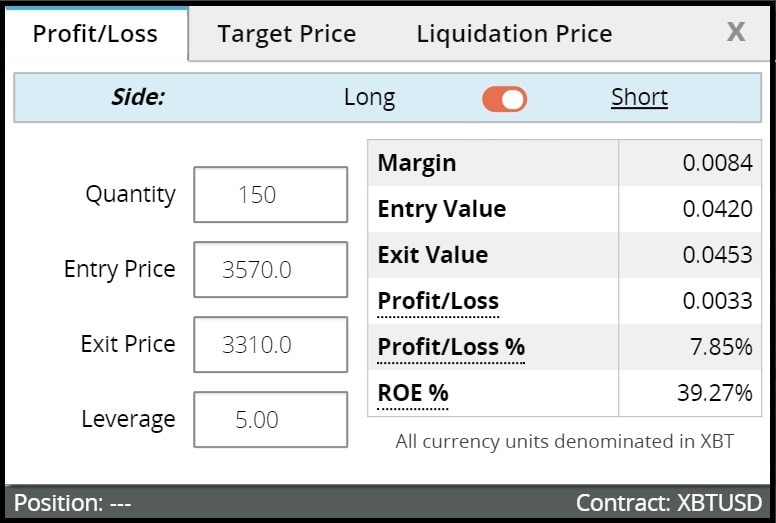
- After your funds have shown up in your account, click the Trade tab (1), then find the Place Order section on the left-hand side of your screen. Click the Calculator icon (2), and a pop-up calculator will appear.
- Toggle the switch button so it selects Short (3). Next, direct your attention to the four input fields below (4).
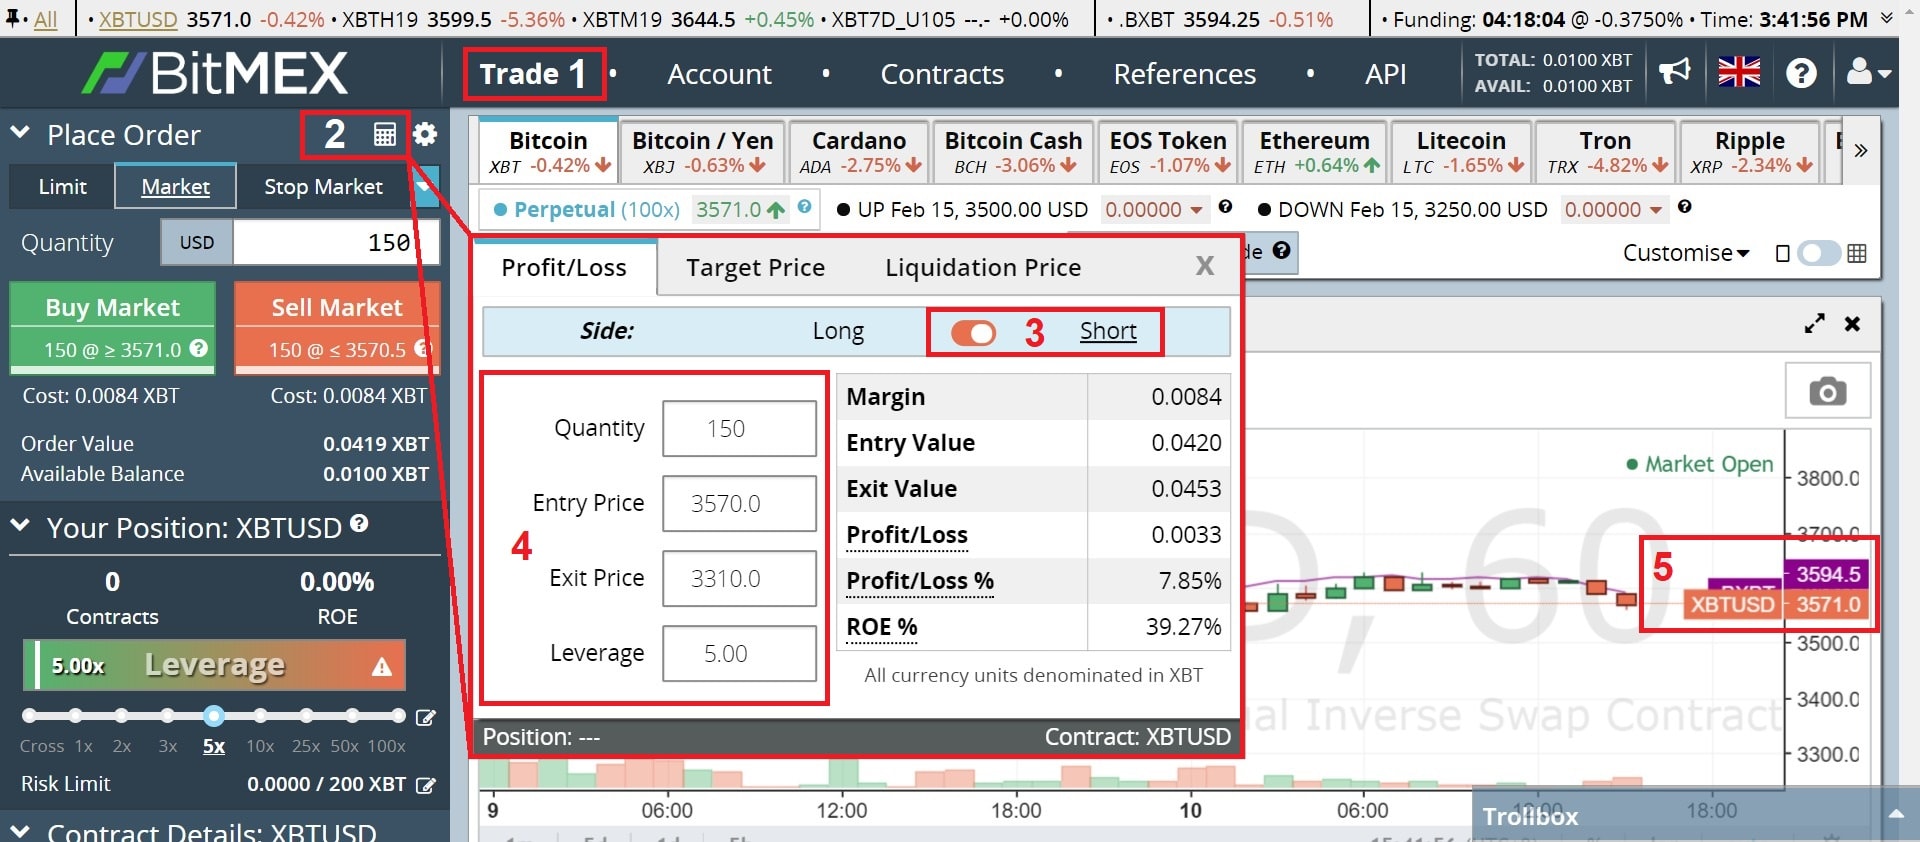
Each input field represents:
- Quantity — The amount of Bitcoin contracts you’ll be purchasing in USD. The diagram above shows a Quantity of 150 contracts, and the amount of XBT (which equals BTC 1:1) will cost is displayed to the right, in the row labeled Margin. The cost for this example is 0.0084 XBT.
- Entry Price — The Bitcoin price you’ll enter the market at. While you can decide where you want to enter the market, we’ll be entering the market at its current price. At the time of writing, the price was $3,570, as seen on the chart to the right of the calculator (5).
- Exit Price — The price you’ll exit the market at. The example Exit Price is $3,310, which is a 7.85% drop from $3,570. You can see the percent difference was automatically calculated in the Profit/Loss % row.
- Leverage — Multiples the effectiveness of your Bitcoin contracts. The example leverage is set to 5x. This means the most you stand to lose is 0.0084 BTC, but you stand to gain a disproportionate amount. This is most clearly displayed in the Profit/Loss % and Return on Entry (ROE%) rows, bringing the Profit % from 7.85% to 39.27%.
BitMEX allows up to 100x leverage for Bitcoin, so adding leverage to your short on BitMEX allows you to make up to 100x more than the actual profit percentage.
Of course, it comes with added risk. The higher your leverage, the less margin for error between your entry price and your liquidation price.
Liquidation Price Calculator
Your liquidation price is a set value that the price of Bitcoin cannot cross. Once the liquidation value is breached, your funds are gone.
Now that you’ve determined your entry, exit, and leverage, it’s time to calculate your estimated liquidation price.
Start by clicking the Liquidation Price tab on your calculator tool (1).
Next, click the toggle button to select Short in the Side row, and leave Isolated selected in the Margin row (2).
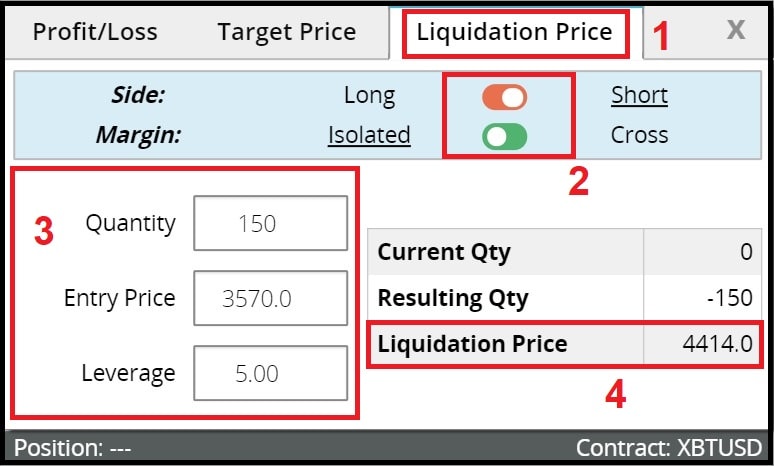
Now enter the same information from the Profit/Loss tab into the text fields (3), and check the price Liquidation Price (4). In this example, your funds will be liquidated when the price of Bitcoin hits $4,414.
As previously mentioned, if you increase your Leverage, your Liquidation Price will be closer to your Entry Price, leaving less room for error. Again, once the price of Bitcoin hits your liquidation price, you will lose your funds.
For example, if we change the leverage to 100x, take a look at how close the liquidation price is to our entry price in the image below.
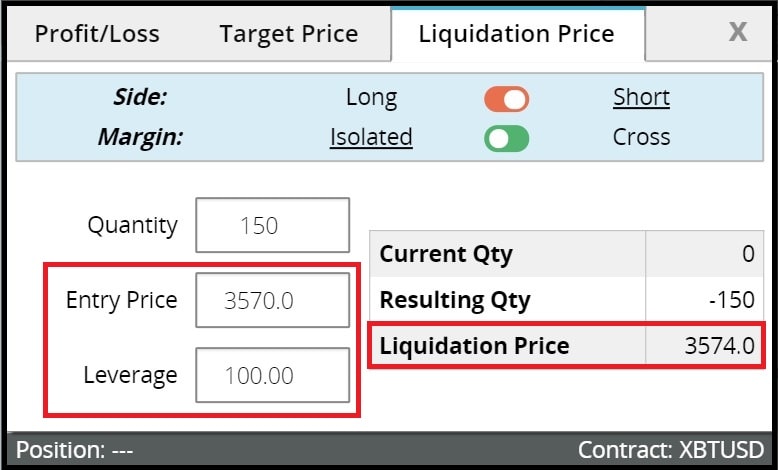
That means a fluctuation of only $4 in Bitcoin’s price would cause your funds to be liquidated, opposed to a fluctuation of $844 at a leverage of 5x.
To start, stick with a leverage of 1x or 2x while you get used to shorting the market. Over time work your way up to 3x, 5x, 10x, and 25x. It’s not recommended to go beyond 25x.
4. Your First Real Trade
Now that you’ve carefully calculated each segment of your trade, it’s time to purchase the contracts.
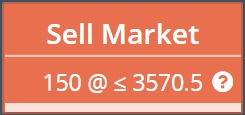
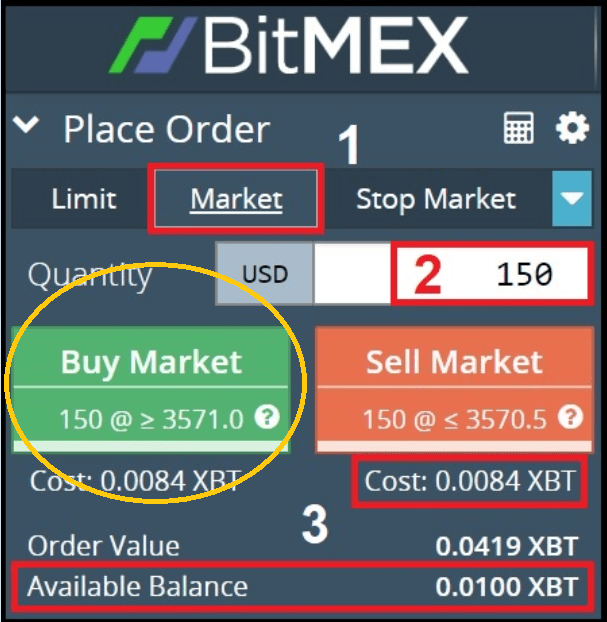
1. Go to the left-hand side of your screen, and under the Place Order tab, click the Market tab (1). This allows us to enter the market at the current price.
2. Next, enter the amount of contracts you wish to purchase (2). We’ll use the same number as we did in the calculator section above: 150.
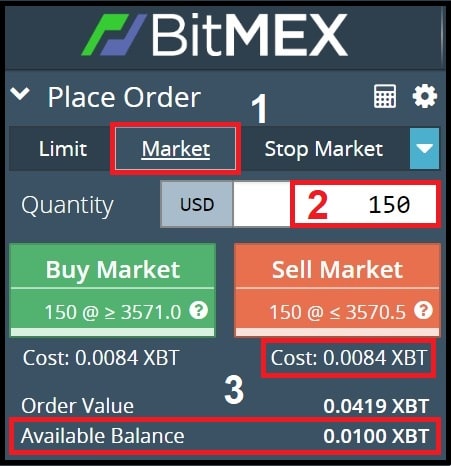
- The total cost in XBT will be displayed under the red Sell Market button. In this case, the Cost after fees is 0.0084 XBT. The funds you deposited earlier will also be displayed in the Available Balance row (3), right beneath your Order Value, which is determined by the Quantity of contracts entered (2).
- Next, select the leverage you’d like to trade with (4). It’s worth noting that the leverage you choose will change the Cost of the contract. Try changing just the leverage to see its effect on the Cost, and notice how the Order Value remains the same.
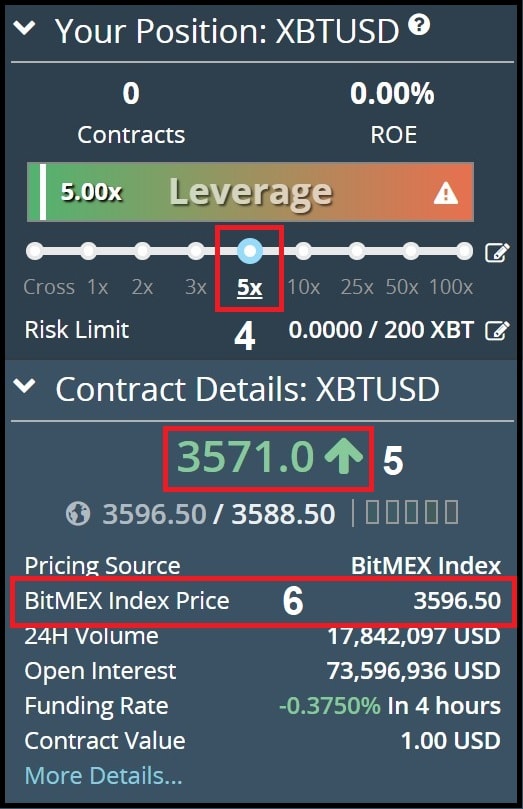
- The price at which contracts are being exchanged (5) is different than the BitMEX Index price of Bitcoin (6).The contract price is displayed with large digits, and will flash red or green in color depending on whether the live trade was a sell or buy, respectively.Note: Liquidation prices are executed based on the BitMEX Index price (6).At this point, your trade information has been calculated and entered into your browser, and now it’s time to officially go short on Bitcoin.
After clicking the button, a confirmation box will pop up, which allows you to confirm the information entered was correct. You can also change the leverage at this stage for whatever reason:
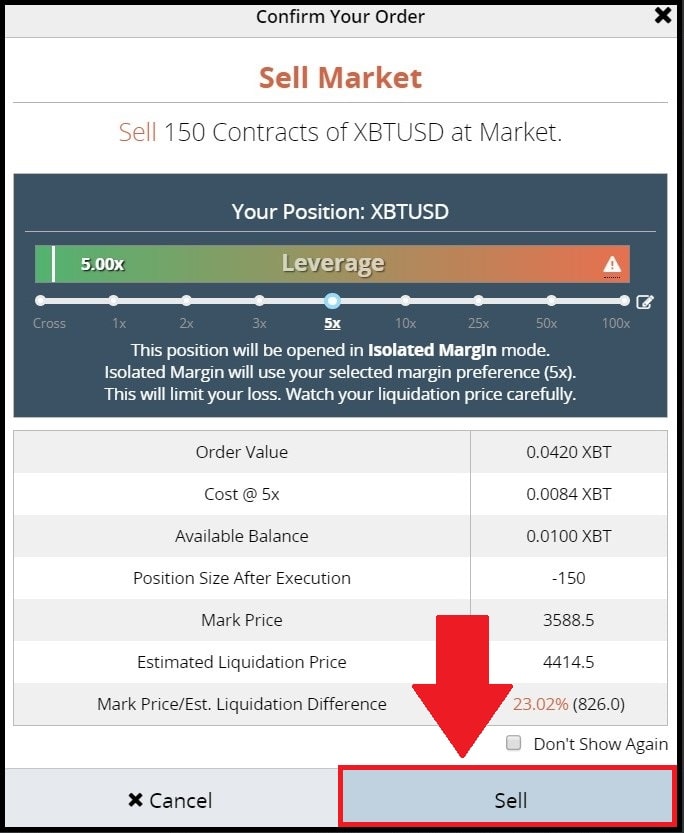
After verifying everything is accurate, click the light blue Sell button at the bottom right-hand of the pop-up.
You should see a submission confirmation pop up at the bottom right-hand corner of your screen that looks like this:
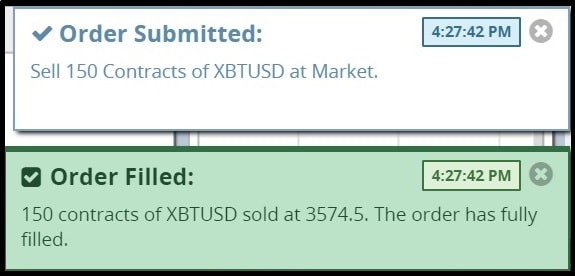
You’ll also see green boxes pop up once the order has been filled. It’s worth noting your entry will sometimes partially fill, which will cause multiple green Order Filled boxes to pop up until the entire order is filled:
Congrats! You’ve just shorted Bitcoin.

Now that you know how to make a short position, let’s learn how to close it.
How to Close a Short Position on BitMEX
Since entering your short position required you to contractually sell the market, to exit your position, you’ll need to buy the market.
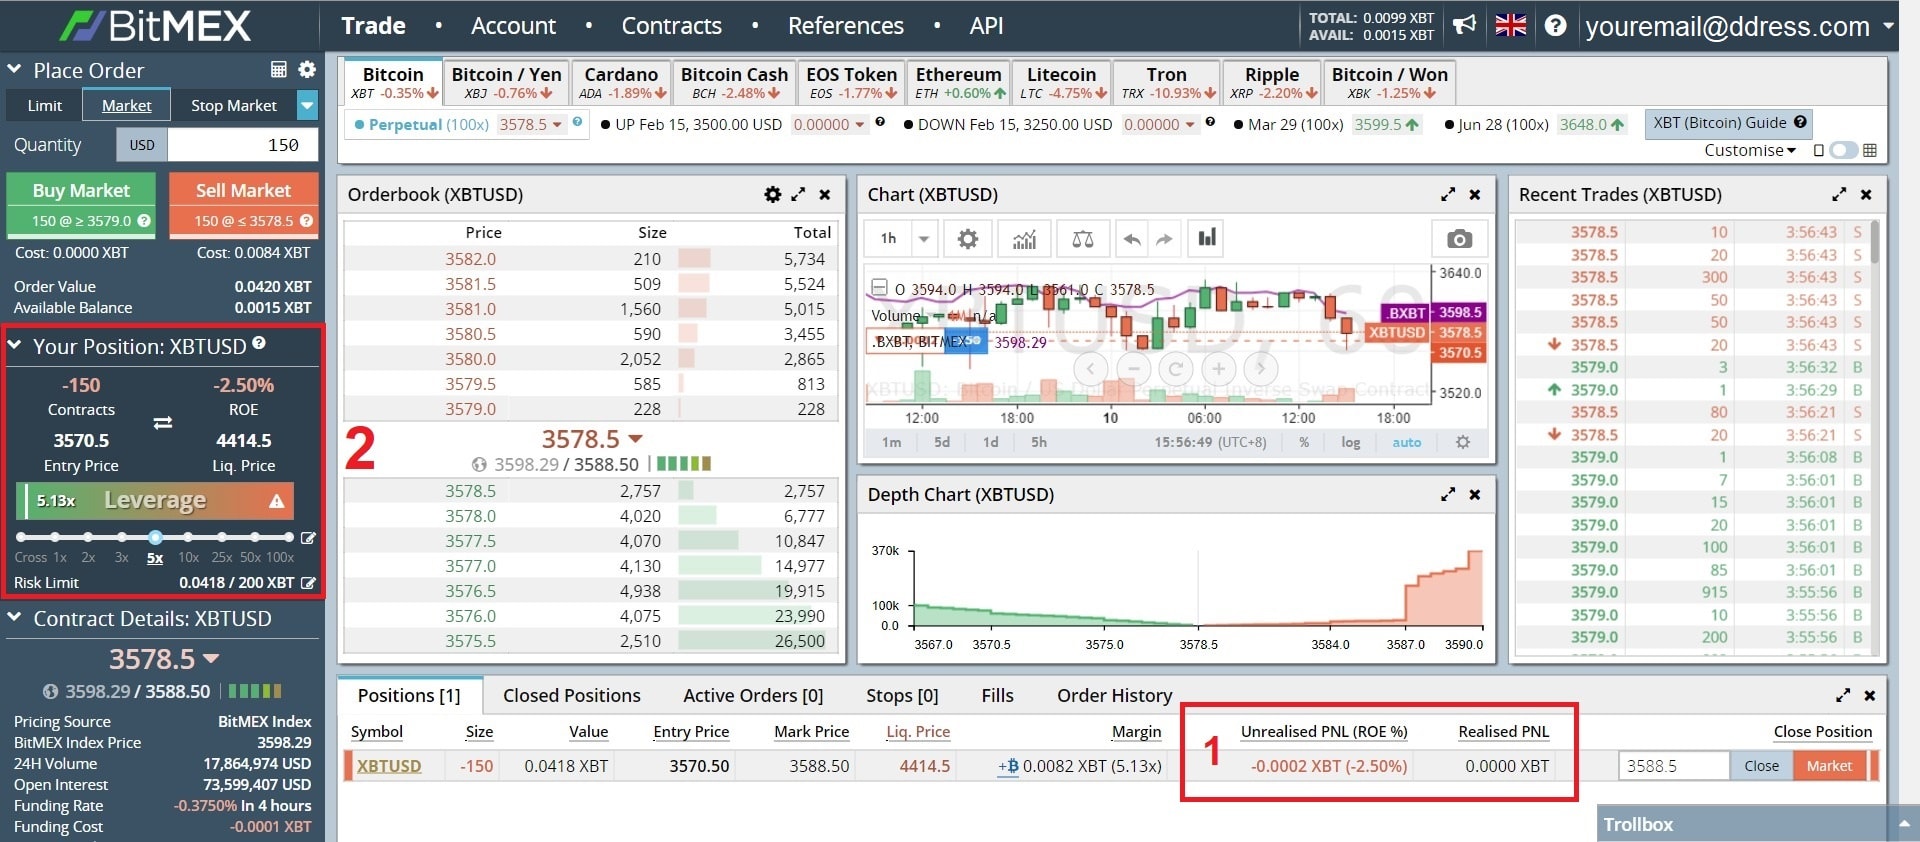
You’ll want to exit the market for 1 of 2 reasons: either you’ve made enough profit, or lost too much and want to avoid liquidation. You can easily keep track of how well your trades are doing near the bottom of your dashboard (1) or on the left-hand side of your screen (2).
Once you decide it’s time to exit, there are 2 different ways to do so, and BitMEX makes both of them very easy to complete.
First, let’s look at where on your screen it will happen. Take a look at the red box below, highlighting the bottom right-hand corner of your screen.
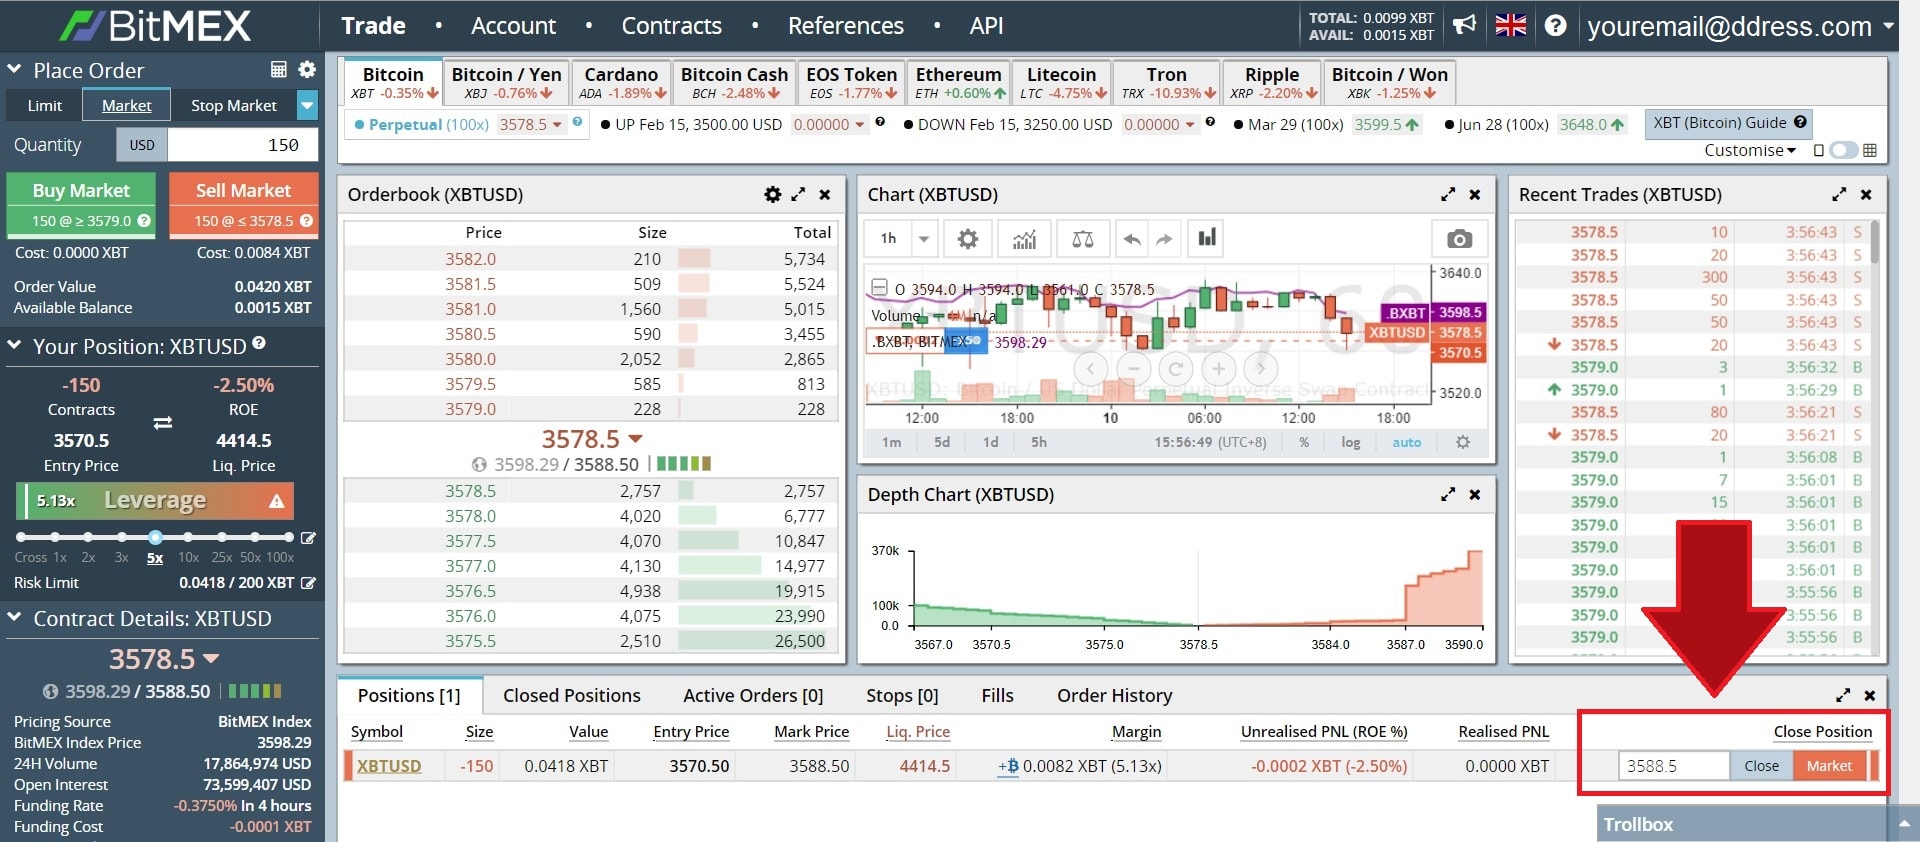
Both methods of closing your order are located in this box. You can either close at the current market price or enter a specific price you’d like to close it at.
Take a closer look below.
Market Close
By clicking the red Market button, you’ll exit the market at the current market price. This is called a Market Close. If you choose to click the market button, you’ll see a confirmation box like this:

Click the light blue Market Close Position Button to exit the market.
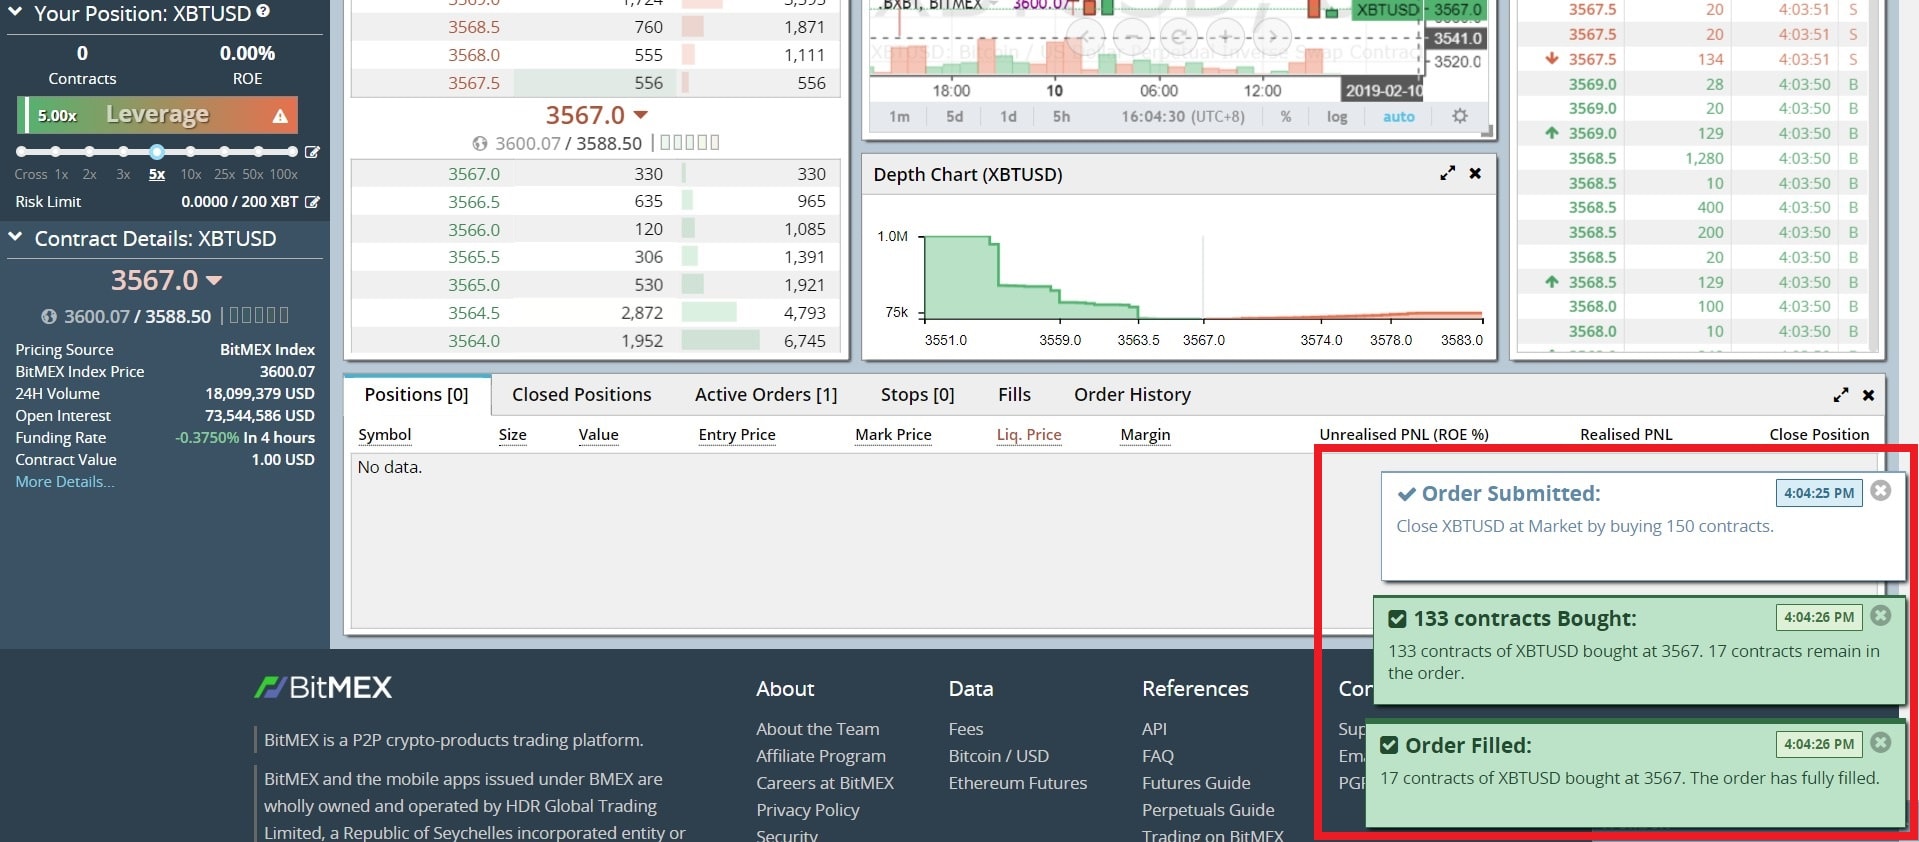
Next, you’ll see an Order Submission box pop up on the bottom right-hand corner of your screen, with green Order Filled boxes popping up as your contracts are bought:
Limit Close
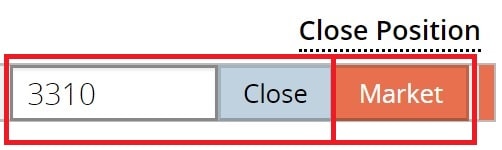
Alternatively, by entering a number in the text field to the left of the gray Close button, you’ll choose the price you want to exit the market at. This is known as a Limit Close.
For this example, we’ll use our previous calculations as an exit price, which was $3,310.

Enter your desired exit price in the text input field and click the gray Close button. You’ll then be prompted with a confirmation box:
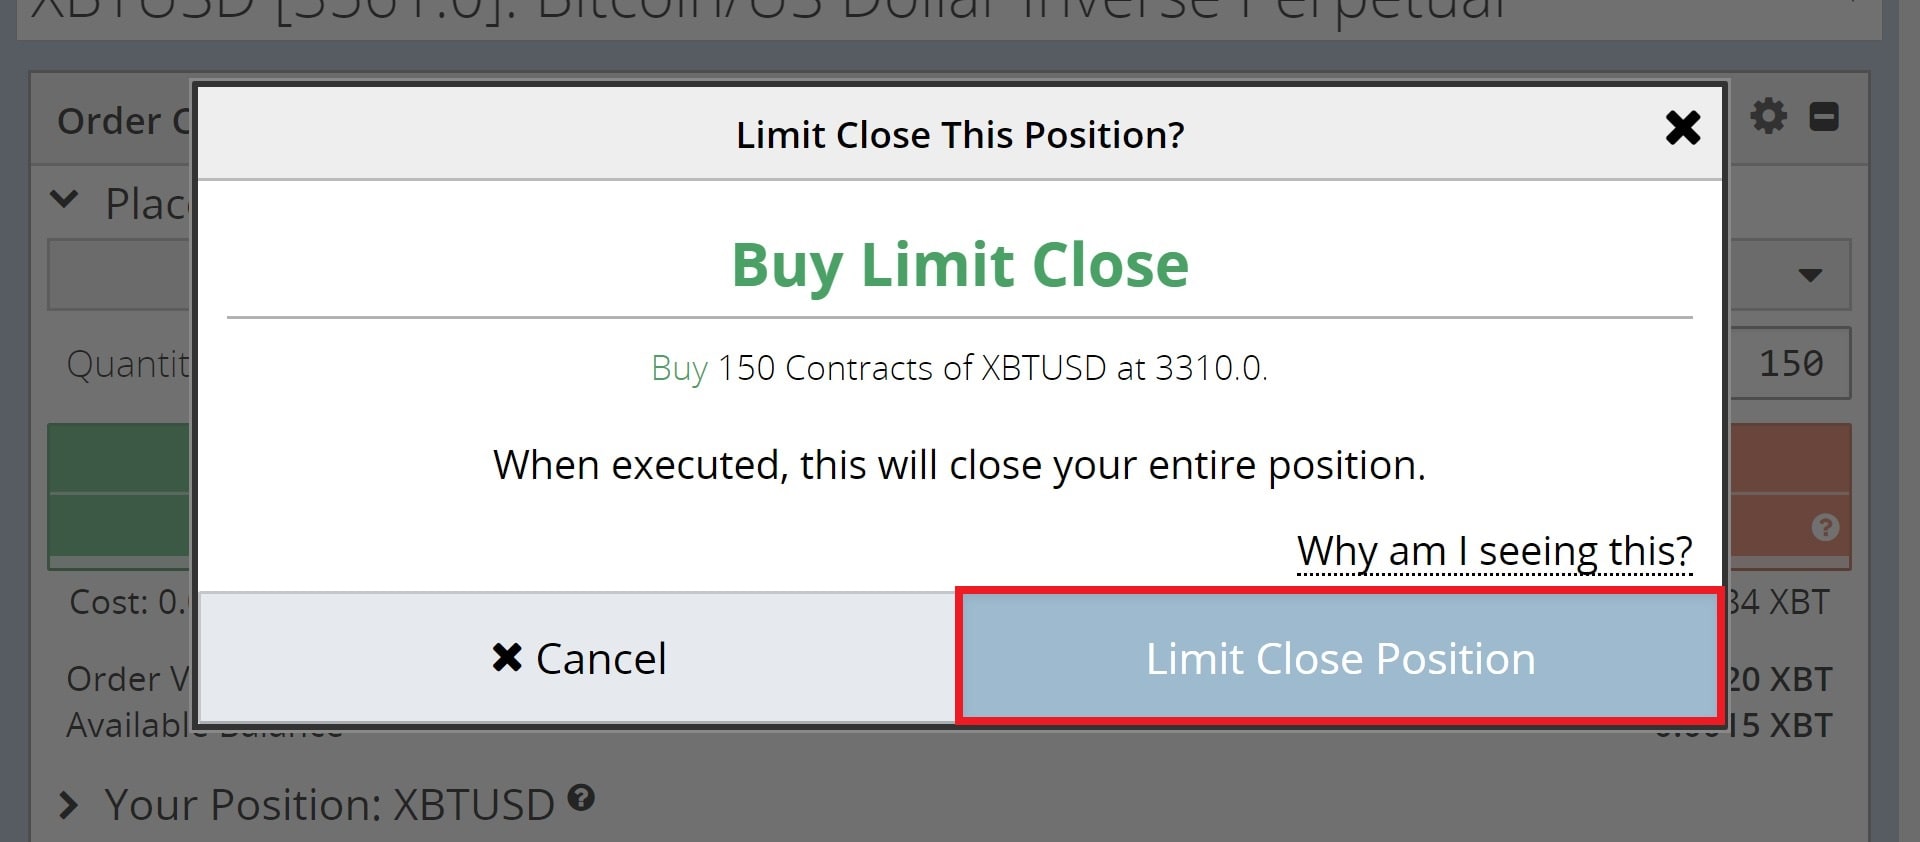
Click the light blue Limit Close Position button to set the price you’ll exit the market.
After you set your Limit Close Position, you’ll see a confirmation pop up in the bottom right-hand corner of your screen (1).
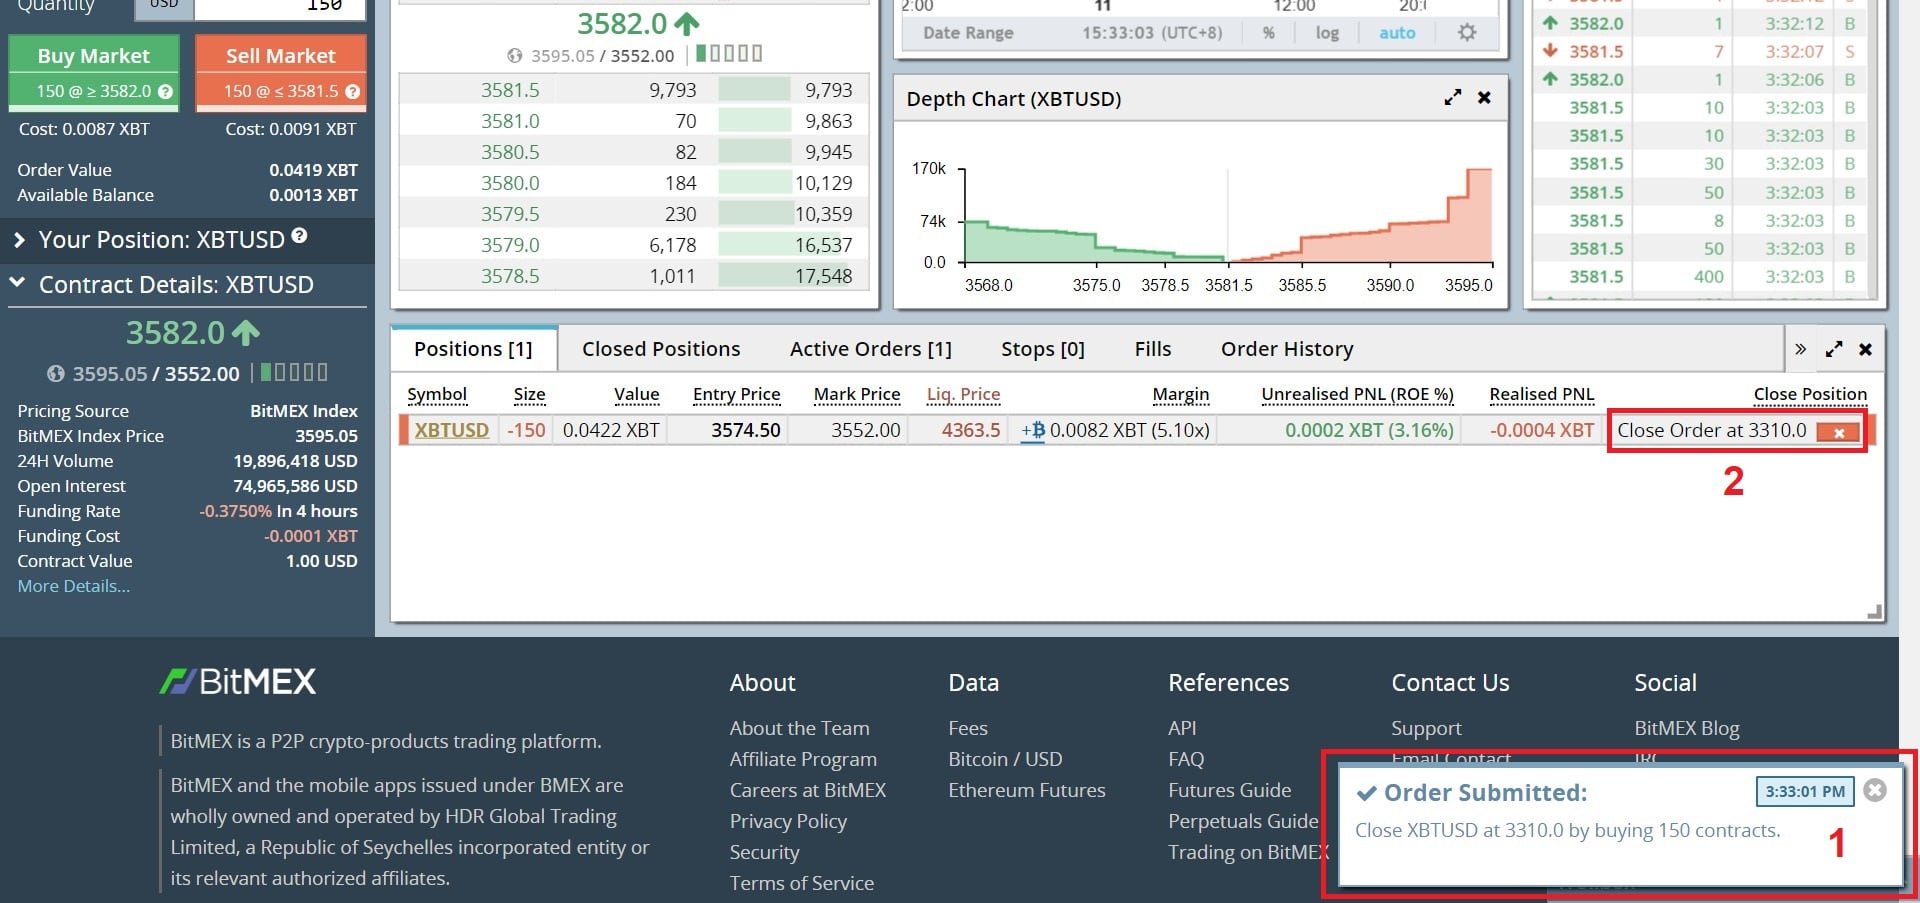
It’s worth noting you can easily cancel your Limit Close by clicking the little red ‘x’ button in the Close Position section of your dashboard (2).
Keeping Track of Your Positions
From position entry to exit, your trading information is conveniently stored directly on the dashboard.
For example, you can keep track of all your orders with the Order History tab.

Click through 6 tabs in the same box you used to close your order to get comfortable with all the information provided.
Simple as that! Now you’re familiar with how to make and close a short position on BitMEX.
If you want to bet on the Bitcoin price rise, you can easily open your long position by going through the same process but the difference is that you have to press the green button as marked below in yellow.
In the next chapter you’ll learn more advanced trading techniques on Bitmex.
For now, we recommend you to take these steps below to secure your Bitmex account.
2-Factor Authentication Setup
Quick Note: If you’re familiar with 2FA and already have the Google Authenticator App, go to the Account tab, click My Account on the left-hand menu, then find the Security section to complete the 2FA process. Once you’re finished, skip ahead to the next section to make your first trade.
If this is your first time setting up 2FA, you’ll need to download the Google Authenticator app for your smartphone or tablet device.
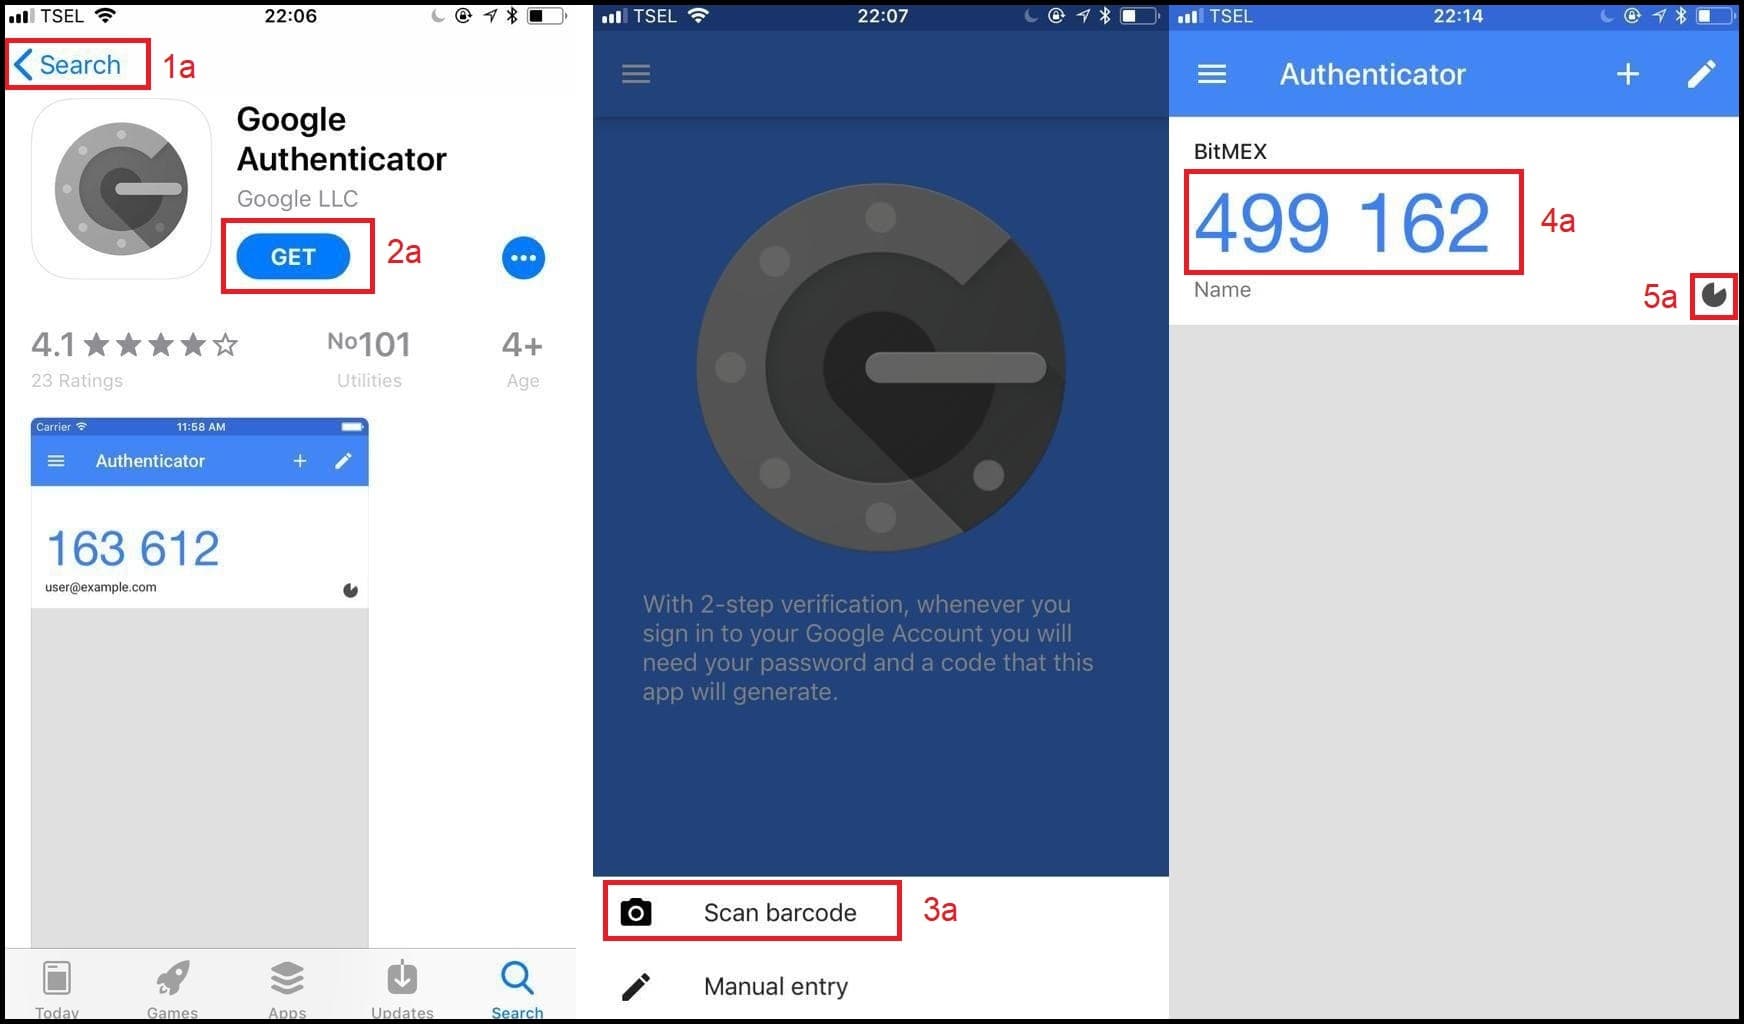
Start by searching for “Google Authenticator” in the App Store for iPhone users, or Play Store for Android users (1a).
Download and install the app to your phone (2a), open it up, and begin.
Your smartphone/tablet screen sequence.
Click the Begin Setup button, then select Scan Barcode in the pop up menu (3a). You’ll need to allow the app to access your camera, then you’ll see your camera open up, with a box inside the screen.
Now you’ll need to jump to your BitMEX screen to locate the QR code you’ll be scanning.
To find the QR code associated with your BitMEX account, login, click the Account tab (1b), click My Account on the left side of your screen (2b), then locate the Security section of the page. Select Google Authenticator from the dropdown menu (3b).
Your computer screen.
Pick up your phone/tablet and align the box on your phone/tablet’s screen with the QR code on your computer screen (4b).
After your phone/tablet reads the code, it will display a 6-digit code (4a) and a timer that changes the code every 30 seconds (5a).
Check to make sure the timer isn’t about to expire, then enter the 6-digit code into your BitMEX account (5b).
Hover your mouse over the additional 2FA features (6b) to learn more about how you can maximize the security of your account. The default settings are satisfactory in most cases.
Important: Be careful, it’s possible to lose your 2FA account information when switching to a new phone, and it can be difficult to recover. Now that your phone is connected to your account, you’ll need to use the Authenticator app to verify logins and withdrawals.
Congrats! You’ve successfully signed up for BitMEX, created and closed a short position, and secured your account with 2FA.