
There are a lot of different ways you can store your Ethereum, from keeping it on online exchanges, to using a software wallet, to getting a hardware wallet. All of these options can be pretty confusing and overwhelming when you’re starting out.
Keeping cryptocurrencies on exchanges leaves them vulnerable to hacking and theft. It’s important to get your digital assets off of online exchanges and into your own hands in order to keep them protected. If you’re looking for a very simple solution to keep your Ether safe and secure, using a paper wallet could be your best bet.
Why Use a Paper Wallet?
A paper wallet is essentially just a piece of physical paper that has your private and public keys required to gain access to your cryptocurrencies. It’s pretty much the same concept as having a $100 bill — it’s a piece of paper that represents a certain amount of money.
Paper wallets are one of the best ways to keep your cryptocurrencies safe from getting stolen by hackers, because they take the coins offline. This is called “cold storage.” The only way someone could steal your coins is if they got into your home and physically obtained the paper wallet. So it’s recommended that you keep your paper wallet in a fireproof safe if you want true ease of mind that your precious cryptocurrencies are safe and sound, from thieves as well as the elements. Treat it like the valuable currency it already is or could become — that little piece of paper could potentially be worth a hefty amount of money one day!
It should be noted that there are some drawbacks to storing your cryptocurrencies on a paper wallet. The most obvious is that it’s a piece of paper that could get damaged or lost. Paper wallets also make your funds less liquid. Should you ever wish to exchange or use your cryptocurrency, you’ll have to transfer it to an online wallet or exchange. This greatly reduces the speed at which your funds can be utilized. However, if you plan on holding your cryptocurrencies long-term instead of actively trading them, this shouldn’t be too much of an issue.
All cryptocurrencies can be stored in a paper wallet. But for this guide, we will focus specifically on how to make an Ethereum paper wallet. Let’s jump in and get your ETH protected!
How to Create an Ethereum Paper Wallet
Step 1: Go to MyEtherWallet
MyEtherWallet is the most trusted and recommended site for creating your Ethereum paper wallet.
NOTE: Do not Google the website name, type it directly into your address bar.
The reason for this is hackers buy ad space with phishing sites and pretend to be the real MyEtherWallet site. If you end up on a phishing site, your Ether could get stolen!
Make sure the address bar looks exactly like this:
![]()
Bookmark this URL and always use that to visit the site. This ensures you are always going to the correct site instead of a fake one.
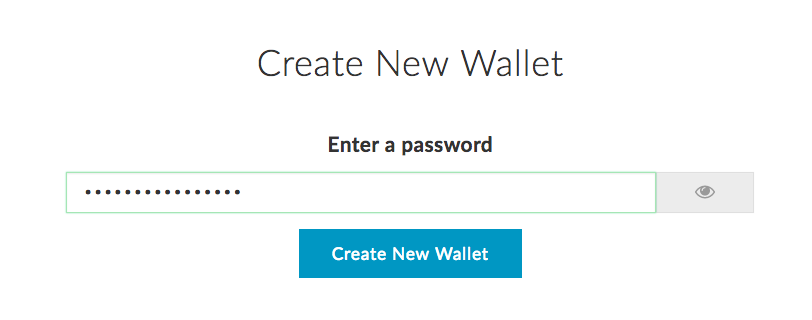
Step 2: Create a Secure Password
It’s recommended that you create a strong password when setting up your wallet. You can go to Secure Password Generator to get a randomly generated, ultra-secure password, or you can come up with one on your own. Write this down somewhere safe so you don’t forget it — this password is essential to accessing your Ether. Then simply enter the password and click “Create New Wallet.”
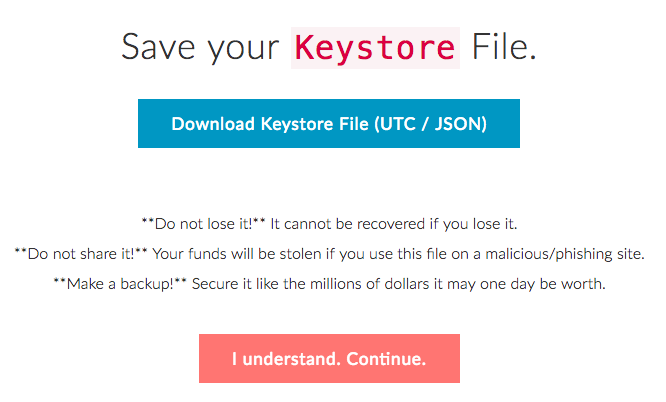
Step 3: Download Keystore File
A keystore file is an encrypted version of your unique Ethereum private key. And, like your password, it’s an essential piece of the puzzle required to access your Ether. Should you ever lose your private key, you will need this file and your password to get your unencrypted private key back. As MyEtherWallet notes, do not lose this and do not share it with anyone. Definitely make a backup of this file and store it on a USB drive. Then click “I understand. Continue.”
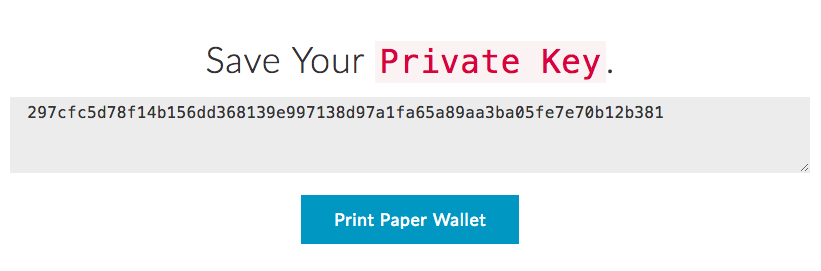
Step 4: Save the Private Key
Next you will receive your private key. This is the third and final thing that you must keep secret and safe. You can also save the private key in a Word document and keep it removed from your computer in a USB drive. This is just in case your paper wallet gets lost or destroyed.
Step 5: Print Out Your Paper Wallet
Now you can finally print out your actual paper wallet. Just click on “Print Paper Wallet” and you will get a piece of paper that looks like this:
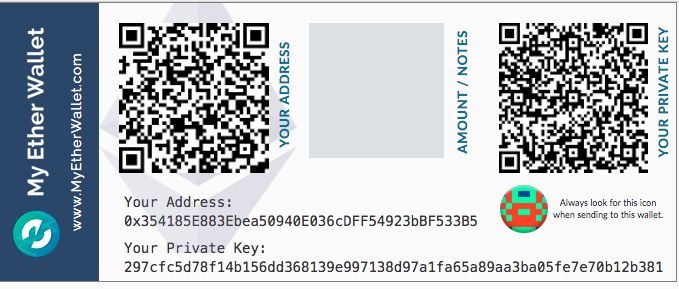
Your paper wallet has all of the following information:
Your address: This is your public address you must provide to have ETH sent to your wallet. It also has a QR code on the left to easily scan the address on a smartphone.
Your private key: Again, don’t share this with anyone. To access your wallet and your ETH, you must type in this key, or use the QR code on the right.
Unique identifier icon: On the right-hand side, you will see a small, colorful icon. That is your unique icon that you should always look for when sending ETH to your wallet. If you see a different icon than this, it means you don’t have the correct public address.
Amount/Notes section: This is just a blank box where you can keep track of your account balance, for instance. You could also write in your password here as well.
If you don’t have a printer, you could just manually write down your address, private key, and password on a piece of paper. The advantage to printing it out is you can use the QR codes instead of having to manually type in the long strings of numbers and letters. Printing is also recommended it if you have hard-to-read handwriting.
Congrats! You successfully created your own Ethereum paper wallet.
And in the wise words of Gandalf:

How to Use Your Paper Wallet
Check Your Balance: You don’t even need to log into your account to check your wallet’s balance. Simply go to https://etherscan.io/ and enter your public address into the search bar at the top right. You’ll see your balance in ETH and USD, plus information about your past transactions.
Receive ETH: Receiving ETH to your paper wallet works just the same as any other wallet. All you have to do is provide your public address or scan your QR code.
Send ETH: To send ETH from your wallet, go back to MyEtherWallet. You have two choices to get into your account — either enter your private key or upload your keystore file. You will also have to put in your password. Once you’ve been authenticated, sending ETH is pretty straightforward. Put in the public address of the wallet you wish to send ETH to and enter the amount. Click “Generate Transaction” and you’re done!
Now you’re a paper wallet pro! As long as you keep your paper wallet protected, you can have the peace of mind knowing your precious ETH is safe and sound.